What is the most expensive part of starting a marine aquarium? No, it’s not the tank itself or the pumps, water, or creatures. It is the rock. Live rock can cost upwards of $7.00 per pound, and a pound of rock is about the size of a small apple. A decent-sized tank can require hundreds of pounds of rock.
Incidentally, if you mention to a novice that you buy rock and that it’s “live,” they may think you’re using some of that medical marijuana we’ve been hearing so much about lately.
Cheap and attractive
We should use some live rock from the sea for the bacteria it contains, but we can save thousands of dollars and have nicer looking rock than can be found in a store. LFSs don’t sell delicate-looking rock, but it’s not their fault. Most rock is harvested in the tropics, thrown up on barges, then boxed and shipped all over the globe. Any interesting protuberances tend to break off in the process, so we are often left with roundish-looking, uninteresting pieces.
But we are in luck because, for minimal cost, we can build very interesting pieces of rock that look better than most of the real stuff on the market. What’s more, it has the added benefit of being hollow, which provides much more living space for bacteria.
In fact, I collected all the rock for my tank from the sea back when it was legal, but over the years, I have replaced much of it with homemade rock, as it is just better looking.
Let’s get rockin’!
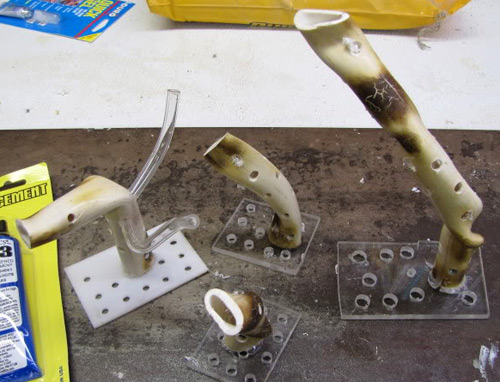
To make the rock, I use a piece of PVC pipe. Electrical PVC is better than plumbing PVC only because it’s gray and not white, but either one can be used. Half-inch pipe works well and a 10-foot length is less than $5.00.
Next, follow these simple steps:
- Cut the pipe to the size you want, and drill a bunch of holes in it. Any size holes will do. Quarter-inch is fine. Then add a base or stand if it will be a free-standing piece. I take a piece of acrylic and put a nylon screw through it, then fill the end of the PVC pipe with glue gun glue and stick the screw in. (Note: glue gun glue is not glue per se; it is just plastic and is reef safe. I use it all the time.)
- Take the pipe outside and heat it with either a propane torch or a good heat gun and bend the pipe into the desired position. If you use a torch, you’ll need to have water handy, as the PVC can easily catch fire. Also, be aware that PVC fumes are toxic and will sicken you if inhaled, so you cannot do this indoors!

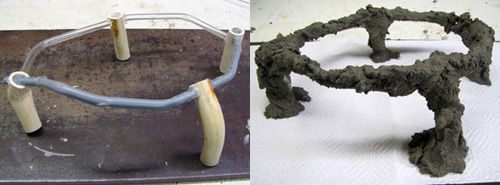
- Because cement will not stick to PVC, you’ll need to wrap tightly all around the pipe with string (like the kind you get in a bakery).
- Mix some regular cement. I use Sakrete mortar mix that you can get at a hardware store in very small bags. Mix the first coat a little watery, and smear it on the string. Very little will stick—just a coating, which is fine.
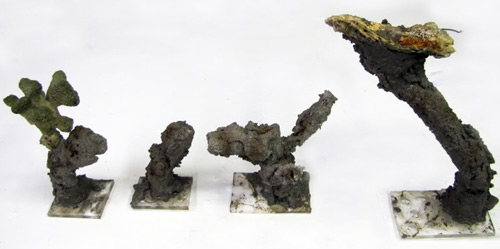
- Go out to dinner or text your friends and let the thing sit for a day or two. Put on another coat, and do the same thing. After a day or two, do it again. This may take a week or two, but it only takes five minutes every day. After the third or fourth coat, it will start to go on thick. Now you can get creative and sloppy. Just blob on the cement, and don’t smooth it out. Stick holes in your creation with a pencil. Try not to be neat. You can also make holes to fit corals later on if you like.

- Soak the rock in fresh water for a week or two and put it in your tank. In a few weeks, coralline algae, which loves cement, will begin to grow on it.

Photo credit: Paul Baldassano


